


結露防止ヒーターリング 6インチ用|CE-AAHR6-94050
結露防止ヒーターリング 6インチ用|CE-AAHR6-94050
残り 1 個
受取状況を読み込めませんでした
2年保証(電子部品は1年)
- 補正レンズを直接加熱し、最も効率的に結露の発生を防ぎます。
- 鏡筒に常設するタイプのため、見た目もすっきりしており、持ってくるのを忘れる心配もありません。
- セレストロン製Smart DewHeaterコントローラー(別売)と併用することで、内蔵サーミスタが補正レンズの温度を継続的に監視します。
- 剛性が高く、軽量で耐久性に優れたアルミニウム製。
- 付属の収納クリップとケーブルマネジメントクリップにより、ケーブルを整理できます。
Item#:CE-AAHR6-94050
製品仕様
製品仕様
| 標準仕様 | |
|---|---|
| 最大出力 | 12ワット |
| 電源ジャック | 12V DCバレルコネクター、5.5mm/2.1mm、センタープラス |
| リング構造 | アルミニウム |
| 電源ジャック延長ケーブル | 152.4mm長、12V DC、片端5.5mm/2.1mmバレルコネクター、もう片端オスRCAコネクター、センタープラス |
| サーミスタージャック | 2.5mmオーディオジャック、Celestron SmartHeat結露防止コントローラー対応 |
| 互換性 | 6インチ シュミットカセグレン |
| 結露防止リング内径 | 153.4mm |
| 結露防止リング外径 | 176mm |
| 重量 | 62.2g |


よく一緒に検討されている商品

CE-AAHR6-94050
セレストロン結露防止ヒーターリングは、セレストロン望遠鏡に最適な結露対策ソリューションです。一年中、観測や撮影の夜をより快適にする必須のアクセサリーです。このヒーターリングは、6インチのセレストロン製シュミットカセグレン鏡筒に、既存のリテーナーリング(固定リング)と交換して常設するため、常に鏡筒と一体化させておくことができます。取り付けは迅速かつ簡単です(詳細はマニュアルの手順に従ってください)。
仕組み
ヒーターリングは、シュミット補正レンズを固定しているプラスチック製のリテーナーリングと交換して取り付け、レンズ全体を効率的に加熱します。リングは軽量で耐久性のあるアルミニウム製で、その頑丈なフレームがケーブル回路と望遠鏡の補正レンズを支えます。レンズセル全体を温めて間接的にガラスへ熱を伝える従来のヒーターバンドとは異なり、このヒーターリングは補正ガラスを直接加熱するため、最も効率的な熱伝達で結露を防ぐことができます。
リングを外部12V DC電源に接続するだけで、湿度の高い過酷な条件下でも結露の発生を防ぐ安定した継続的な加熱が得られます。また、使用しない時に電源ジャックとサーミスタジャックを固定できる2つの収納クリップを備えており、装着したまま望遠鏡のダストカバー(キャップ)を閉じることも可能です。さらに、鏡筒のフロントセルに取り付け可能なケーブルマネジメントクリップも付属しており、ケーブルのぶらつきを防ぎ、接続部にかかる不要な負荷を軽減します。
セット内容:
結露防止ヒーターリング
ケーブルマネジメントクリップ
電源ジャック延長ケーブル
取り付け用ペーパーシールド
セットアップのアップグレード
電力効率を最大化しながら最高レベルの結露防止を実現するために、Smart DewHeaterコントローラー(別売)との併用を強くお勧めします。このコントローラーは、リング内蔵のサーミスタと環境センサーを使用して、周囲の温度・湿度および補正レンズの温度に基づき、結露を防ぐために最適な熱量のみを供給します。これにより電力消費を大幅に抑え、バッテリー寿命を劇的に延ばすことが可能です。また、付属の延長ケーブルを使用して、コントローラーやサードパーティ製コントローラーの出力ポートに接続できます(注:内蔵サーミスタはセレストロン製Smart DewHeaterコントローラーとのみ互換性があります)。
また、併せてフードの使用もお勧めします。必須ではありませんが、フードを併用することで、ヒーターがレンズをクリアに保つのに必要な電力を節約できます。
Suggested Accessories
Categories
Q:
The Dew Heater Ring is compatible with 5" or larger Celestron Schmidt-Cassegrain telescopes (SCTs) built since the year 2006. I’m not sure when my SCT was built. How can I determine if the Dew Heater Ring is compatible?
The Dew Heater Ring is compatible with 5" or larger Celestron Schmidt-Cassegrain telescopes (SCTs) built since the year 2006. I’m not sure when my SCT was built. How can I determine if the Dew Heater Ring is compatible?
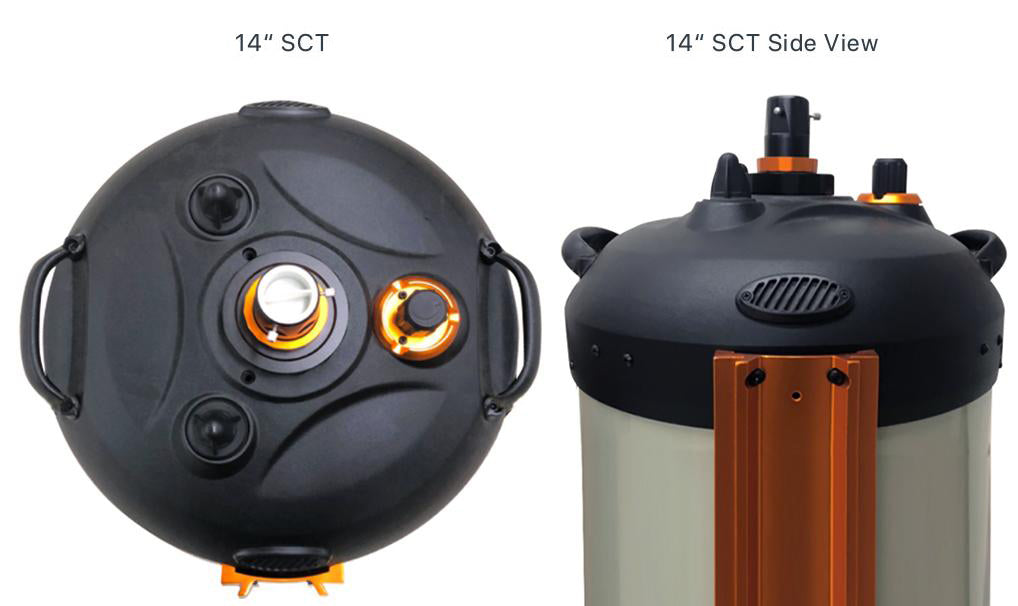
You can determine if the Dew Heater Ring is compatible with your Celestron SCT by examining the design of its rear cell. This applies to fork mounted optical tubes and optical tubes with dovetail mounting bars. Older generation Celestron SCTs (the C5, C8, C11, and C14) built before the year 2006 are not compatible with the Dew Heater Ring. These older optical tubes have either a flat face or a ribbed face on the rear cell. See photo examples below.

Newer generation Celestron SCTs built in the year 2006 or later are compatible with the Dew Heater Ring. These newer OTAs have a trilobed shape on the rear cell. In addition, newer generation 14" SCTs have a rounded rear cell. See photo examples below. All EdgeHD, RASA, 6” Schmidt-Cassegrain and 9.25” Schmidt-Cassegrain telescopes are compatible with the Dew Heater Ring.

Q:
During installation of my Dew Heater RIng, I noticed that my 6” Schmidt Cassegrain has socket head cap screws securing the corrector retaining ring but the included Setup Guide only mentions Phillips-head screws. What size hex key is needed to remove these screws?
During installation of my Dew Heater RIng, I noticed that my 6” Schmidt Cassegrain has socket head cap screws securing the corrector retaining ring but the included Setup Guide only mentions Phillips-head screws. What size hex key is needed to remove these screws?
Some 6” Schmidt Cassegrains do use socket head cap screws instead of Phillips head screws, these screws require a 2mm hex key to remove and reinstall.
Q:
During installation, I removed the telescope's Schmidt corrector retaining ring. But some of the gasket material underneath the ring is still stuck onto the front cell of the telescope. What should I do?
During installation, I removed the telescope's Schmidt corrector retaining ring. But some of the gasket material underneath the ring is still stuck onto the front cell of the telescope. What should I do?
For the Dew Heater Ring to seat properly against the Schmidt corrector, all the gasket material should be removed. For most telescopes, the gasket material can be removed with little to no force. However, some units may have some gasket material stuck onto the front cell due to seepage from the glue used during assembly. If any gasket material is adhered firmly to the front cell, carefully peel or scrape it away. When you do this, make sure to use the included paper installation shield to keep particles off the Schmidt corrector lens. If you use a knife or other tool to remove the gasket material, be very careful to avoid coming into contact with the Schmidt corrector. Also, be sure the optical tube is pointing up when doing this (as shown in the manual during assembly) so the Schmidt corrector itself cannot easily shift its position in the cell.
Q:
When I am using the Dew Heater Ring in “stand-alone” mode by applying power directly to the ring (instead of using an optional Smart DewHeater Controller) that the heating element gets quite hot. Can this affect optical performance since the edge of the corrector will be warmer than the center?
When I am using the Dew Heater Ring in “stand-alone” mode by applying power directly to the ring (instead of using an optional Smart DewHeater Controller) that the heating element gets quite hot. Can this affect optical performance since the edge of the corrector will be warmer than the center?
For each of the Dew Heater Rings, we determined the amount of power required to heat the Schmidt corrector to keep it clear under very heavy dew conditions and engineered the circuitry accordingly. When used in “stand-alone” mode, the heater ring always operates at this maximum power, so the corrector will stay free from dew under virtually all environmental conditions. For smaller telescopes, this does not have a significant effect on optical performance, since not much heat is needed to keep the glass dew-free. However, on the 11” and 14” models, quite a bit of heat is required to keep dew from forming near the center of the Schmidt corrector around the secondary mirror under heavy dew conditions. Because of this, when operating at full power in stand-alone mode, there may be some slight degradation of optical performance for the 11” and 14” models under certain conditions. This is in no way different than other heating bands or straps. We highly recommend using one of the optional Celestron Smart DewHeater Controllers with these larger Dew Heater Rings, as the controller will only heat the corrector as dew conditions warrant, and no loss of optical performance will occur. We also recommend using an optional Celestron Aluminum Dew Shield with the 11” and 14” models, as the Dew Heater Rings (with optional controller) will then not need nearly as much power to heat the corrector to keep the optics clear.
Q:
After installing my 6” Dew Heater Ring on my 6” SCT, I notice there is a slight gap between the dust cover and front of the tube when the dust cover is placed on the telescope. Is this normal?
After installing my 6” Dew Heater Ring on my 6” SCT, I notice there is a slight gap between the dust cover and front of the tube when the dust cover is placed on the telescope. Is this normal?
For the 6” SCT, there is not a lot of space between the dust cover and the Schmidt corrector. So, when the 6” Dew Heater Ring is installed, the cover may not seat precisely flush, there may be a very small gap (about 1mm).
Q:
I have the Celestron Dew Heater Ring installed on my Schmidt-Cassegrain (or EdgeHD) telescope and it appears to interfere with the fit of the Celestron solar filter. Am I doing something wrong?
I have the Celestron Dew Heater Ring installed on my Schmidt-Cassegrain (or EdgeHD) telescope and it appears to interfere with the fit of the Celestron solar filter. Am I doing something wrong?
During the day, dew will not form on the corrector lens, so the Dew Heater Ring should be in its “storage position” with the power and thermistor jacks in their storage clips on the ring, and the cable management clip removed from the telescope. The solar filter will then fit onto the front of the tube without interference.


関連リンク
外部サイトに遷移します