


SCT/EDGE HD用フォーカスモーター
SCT/EDGE HD用フォーカスモーター
残り 1 個
受取状況を読み込めませんでした
2年保証(電子部品は1年)
Item#:CE-AAMT-94155-A
セレストロン製SCTおよびRASA鏡筒に対応した、高精度なモーター
- Celestron フォーカスモーターは、コンピューターまたはCelestronコンピューター制御架台ハンドコントローラーを使用した電子フォーカスを可能にし、遠隔/ハンズフリー観測を実現します。
- 自己給電:Celestronコンピューター制御架台に接続すると、架台が電源を供給します。コンピューターに直接接続すると、USBが電源を供給します。
- Celestron シュミットカセグレン、EdgeHD、およびローアッカーマンシュミット撮影鏡の幅広い鏡筒に対応。完全なリストについては説明を確認してください。
- モーター制御には、複数の速度レート、自動GoToインデックス付きフォーカサー位置、およびフォーカサーバックラッシュ補正が含まれます。
- Windows用フォーカサーユーティリティソフトウェアがシンプルなユーザーインターフェースを提供します。Celestron PWIとも互換性があります。
- ASCOMを介したサードパーティソフトウェアとカメラによるオートフォーカスを可能にします。
- インデックス付き焦点位置により、モーターが以前の焦点位置に自動的に戻り、フォーカスモーターが望遠鏡の機械的フォーカス移動範囲の端に到達するのを防ぎます。
- 現在、9.25インチ EdgeHDに対応しています。
製品仕様
製品仕様
| 標準仕様 | |
|---|---|
| モーター | DCサーボモーター |
| 平歯車 | 真鍮、1:1ギア比、直径35.2mm、42歯 |
| フォーカサーシャフトカプラー | アルミニウムクランプスリーブ |
| マイクロプロセッサー | NXP Kinetisシリーズ、Arm Cortex-M4コア |
| AUXポート電源 | Celestronコンピューター制御架台AUXポートから給電、接続ケーブル付属 |
| USBポート電源 | 最低900mA供給可能なUSB3またはUSB2 |
| DCジャック電源 | 12V DC、1A、5.5mm/2.1mm、センタープラスプラグ |
| 互換性 | 2006年以降に製造されたすべてのSCT(5インチSCTを除く)、すべてのEdgeHD、RASA 8インチ、RASA 36cm、7インチマクストフカセグレン |
| 速度レート | 8°/秒、32°/秒、128°/秒 |
| フォーカサー1回転あたりのステップ数 | 1000ステップ |
| 重量 | 0.42kg |


CE-AAMT-94155-A
フォーカスモーターは、Celestron シュミットカセグレン(SCT)、EdgeHD、および RASA 望遠鏡鏡筒に電子フォーカス機能を提供します。フォーカスモーターを取り付けることで、フォーカスノブを使用する代わりに、望遠鏡のハンドコントローラーまたはコンピューターを使用して、天体をシャープで正確な焦点に合わせることができます。フォーカスモーターは、正確な焦点を合わせたい眼視観測者(特に手先の器用さに問題がある方)にとって優れたツールであり、天体撮影者にとっては必須のアクセサリーです。モーター駆動フォーカサーを取り付けると、天体撮影者は画像の焦点を合わせるために物理的に望遠鏡の近くにいる必要がなくなります。架台とカメラのコンピューター制御と組み合わせることで、フォーカスモーターにより、裏庭の天文台から、あるいは数百マイル離れた場所にある望遠鏡からでも、遠隔でデータを収集することができます。さらに特典として、ポートカバーは使用していないときにポートを保護し、テザー設計によりカバーを紛失することはありません。
対応鏡筒
フォーカスモーターは、2006年以降に製造された口径6インチから14インチまでのすべてのSCTに対応しています。5インチSCTや古いモデルには対応していません。8インチ ローアッカーマンシュミット撮影鏡(RASA)、36cm RASA、7インチ マクストフカセグレン、およびすべてのEdgeHD鏡筒に対応しています。RASA 11(91075)は#94155-Aフォーカスモーターに対応していますが、RASA 11用フォーカサー改造キットが必要です。RASA 11 V2(91076)は改造キットなしで#94155-Aに対応しています。
6インチ シュミットカセグレン望遠鏡のみ、機械的干渉のため、フォーカスモーター取り付け時にオフアキシスガイダー(#93648)は使用できません。
互換性を確認(Celestronの海外公式サイトに遷移します)
電源オプション
Celestron フォーカスモーターには3つの電源オプションがあります
Celestron コンピューター制御架台を使用する場合、付属のAUXケーブルを使用して架台経由でフォーカスモーターに電源を供給し、制御できます。これにより、架台のハンドコントローラー(NexStar+またはStarSense)またはコンピューターから制御できます。
Celestron 架台を使用しない場合、コンピューターのUSBポートからフォーカスモーターに電源を供給し、制御できます。ユーザー提供のUSB A-to-Bケーブルが必要です。
モーターの電源ジャックに接続する外部12V DC電源を使用することもできます。
対応ソフトウェア
Celestronは、コンピューター制御用の無料のフォーカサーユーティリティプログラムを提供しています。Celestron PWI ソフトウェアもフォーカスモーターを制御できます。サードパーティのフォーカサー制御ソフトウェアを使用するには、ASCOMドライバーが必要です
Suggested Accessories
Categories
Q:
The Focus Motor is compatible with 6 inch or larger Celestron Schmidt-Cassegrain telescopes (SCTs) built since the year 2006. I’m not sure when my SCT was built, how do I determine if the Focus Motor is compatible or not?
The Focus Motor is compatible with 6 inch or larger Celestron Schmidt-Cassegrain telescopes (SCTs) built since the year 2006. I’m not sure when my SCT was built, how do I determine if the Focus Motor is compatible or not?
You can determine if the Focus Motor is compatible with your Celestron SCT by examining the design of its rear cell. This applies to fork mounted optical tubes and optical tubes with dovetail mounting bars. Older generation Celestron SCTs built before the year 2006 are not compatible with the Focus Motor. These older optical tubes have either a flat face or a ribbed face on the rear cell. See photo examples below. 
Newer generation Celestron SCTs built in the year 2006 or later are compatible with the Focus Motor. These newer OTAs have a trilobed shape on the rear cell. In addition, newer generation 14 inch SCTs have a rounded rear cell. See photo examples below. All 6” SCTs built in 2006 or later are compatible with the focus motor. 

Q:
Installing the Focus Motor ASCOM Driver on PCs Running an Older Windows OS
Installing the Focus Motor ASCOM Driver on PCs Running an Older Windows OS
The ASCOM driver must first be downloaded and installed on your Windows computer. You can find the ASCOM driver on the Focus Motor product page at www.celestron.com under the “Support and Downloads” tab. Click on the downloaded .exe file, and the driver will install on your computer. For PCs running Windows 10 OS, the Focus Motor ASCOM driver should find and connect to the Focus Motor when it is plugged into a USB port on the PC. For PCs running an earlier OS than Windows 10, the Focus Motor connection to the driver does not occur automatically. Please follow these steps to connect the Focus Motor and ASCOM driver:
1. Open this link using a browser other than Internet Explorer or Edge: http://software.celestron.com/installers/Focuser/USB_Device_Driver/
You should see a screen which looks like this:
2. Right-click on the USB_DeviceDriver.inf file, and select “Save link as…”. Then, save the file to a location on your computer.
3. Next, update the driver from the computer’s Device Manager. Locate the new hardware under “Ports (COM & LPT)” which may show a (!) symbol next to the Focus Motor indicating the device is not yet working. Right-click on the device and select “Update Driver Software…”. Then select the file path where you saved the downloaded INF file. 
4. The ASCOM driver should now connect properly to the Focus Motor.
Q:
After installation, upon powering the motor, the motor is straining to turn the focuser knob, or will not move the focuser knob at all. I have confirmed the motor’s clamping screw is tightened, what is going on?
After installation, upon powering the motor, the motor is straining to turn the focuser knob, or will not move the focuser knob at all. I have confirmed the motor’s clamping screw is tightened, what is going on?
Improper installation is the likely culprit here. The original Setup Guide provided with the focus motor neglected to mention some key details which could lead to improper installation. The result is the motor can be slightly tilted relative to the focuser knob, which can cause the focuser to bind when the motor’s clamping screw is tightened. We have updated the Setup Guide to include additional installation tips and details, you can download the most current Setup Guide from the Focus Motor webpage at celestron.com. The solution is to uninstall the focus motor and cover plate from the telescope and they reinstall by carefully following the revised Setup Guide instructions.
To summarize, there are two areas where tilt can be introduced when installing the focus motor – (1.) installation of the cover plate onto the recess in the telescope’s rear cell, and (2.) installation of the focus motor onto the cover plate.
Installation of the Cover Plate
Here are the key installation tips to follow to prevent tilting of the cover plate and focuser knob during installation:
- We recommend first placing the telescope tube in a vertical position (i.e. with the front aperture facing the ground) during installation, as this will prevent any sagging due to gravity before the cover plate screws are fully tightened.
- When attaching the cover plate to the telescope’s rear cell, before the screws are fully tightened and the cover plate can still move around slightly, make sure the central hole in the cover plate is concentric with the brass cylinder of the focuser knob.

- When tightening the cover plate screws, hold the brass cylinder concentric with the cover plate while tightening the three screws by a small amount each. Follow the arrows in the illustration below for the tightening sequence. This will require two or three passes. DO NOT OVERTIGHTEN THE SCREWS! This can cause the focuser bearing to bind. The screws should be tight enough to prevent any lateral movementof the focuser knob, but not so tight that it binds. The cover plate must install flatly onto the machined surface in the recess without tilting.

- After tightening the cover plate screws, check to make sure the focuser knob cannot move when applying side pressure to it. If the focuser knob can move, then the brass cylinder will need to be re-centered), and the screws will need to be tightened a little more. This is an important step, as it will ensure the focus motor will install straight and won’t bind and become inoperable. However, do not overtighten the screws!
- Rotate the focuser knob a couple rotations in each direction to make sure it moves smoothly and does not bind. If it does bind, then completely loosen the cover plate screws and begin installation again, this time being sure to better center the focus knob and to not overtighten the screws.
Installation of the Focus Motor on the Cover Plate
Here are the key installation tips to follow to prevent tilting of the focus motor during installation:
- Slide the focus motor onto the focuser knob until the two attachment posts on the face of the motor are flat against the cover plate
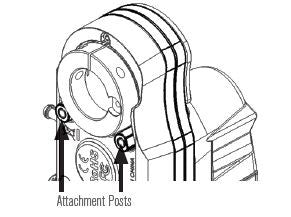
- Check to make sure there are no air gaps between the cover plate and the two attachment posts on the focus motor as indicated by the arrow in the illustration below.

- Tighten the two captive screws on the motor to the corresponding threaded holes on the cover plate using the supplied hex key. Again, first loosely connect the screws to the cover plate, then alternate tightening each screw by a small amount until the focus motor cannot move or wiggle and is solid. Do not overtighten the screws.

Q:
The focus motor has caused the focuser to bind, can I use the provided wrench to turn the rear coupler of the motor to force the focuser to become unbound?
The focus motor has caused the focuser to bind, can I use the provided wrench to turn the rear coupler of the motor to force the focuser to become unbound?
In general, no, as this can damage the focus motor. If after initial installation the focuser binds and the motor cannot turn, loosen the clamping screw on the motor collar. Then uninstall and reinstall the focus motor and cover plate using the tips above (or, better yet, by following the revised Setup Guide). If the focus motor is not causing the focuser to bind, but the motor has become stuck at the end of focuser travel (i.e. as might occur if the focus motor has not yet been calibrated, or as could potentially occur during the calibration routine), then the wrench can be used to slightly back off the focus motor from the end of travel, and normal focus motor operation should resume. DO NOT ATTEMPT TO USE THE WRENCH WHEN THE MOTOR IS POWERED ON! Damage to the motor can otherwise result.
関連リンク
外部サイトに遷移します